User Guide
1. Meet Pepper
Overview
Pin & Brakes
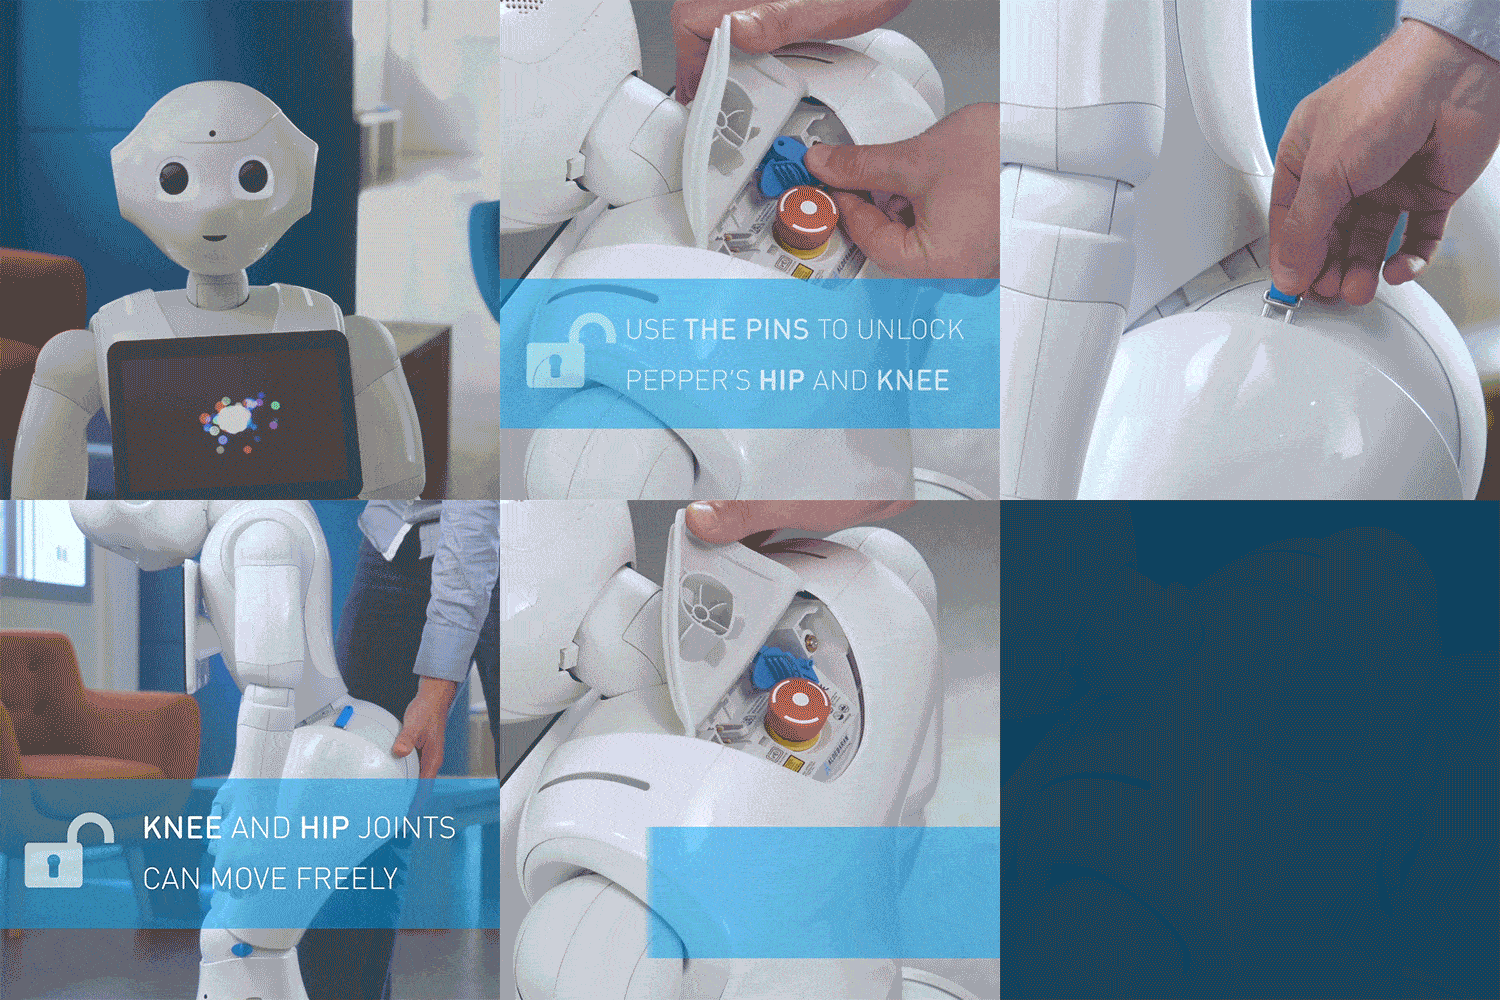
What are Pins?
The Pins are special keys stored in the Neck Soft Cover of Pepper. One goes in the Knee, the other in the Hip.
Pins inserted = Knee and hip joint move freely
Pins removed = Knee and hip joints are locked
Only insert the Pins when Pepper is OFF to:
- clean Pepper.
- rebox Pepper.
- put Pepper in Safe Posture.

Sensors
Pepper understands its environment
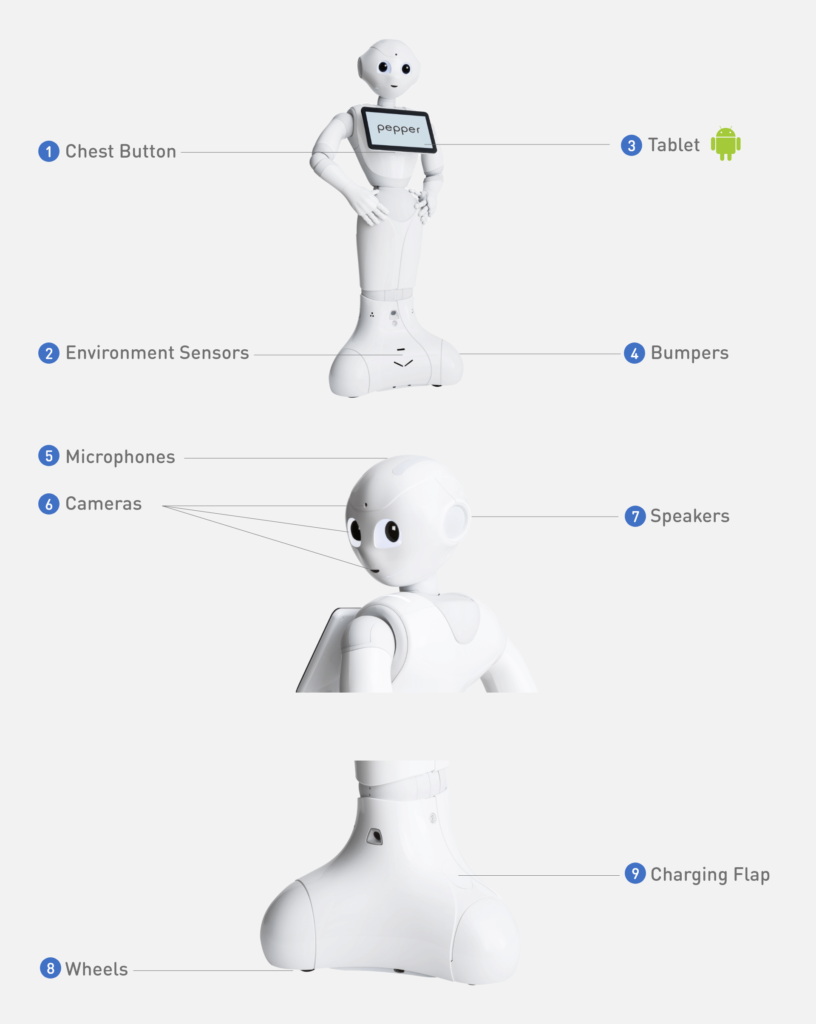
- Microphone: on the top of the head
- Cameras: 2D and 3D stereovision, in eyes, mouth and forehead
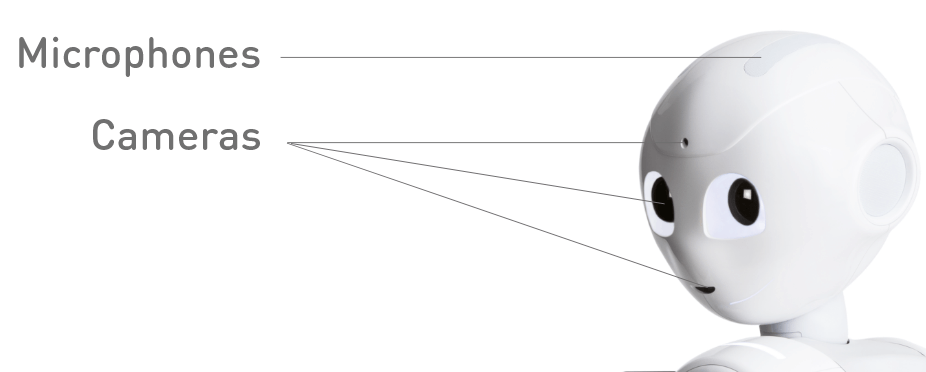
- Environment sensors: lasers, infrared sensor, sonars.
- Bumpers: three bumpers push-button sensors.

Check the Interactions section to know more.
Notifications
The Shoulder LEDs blink when there is a notification.
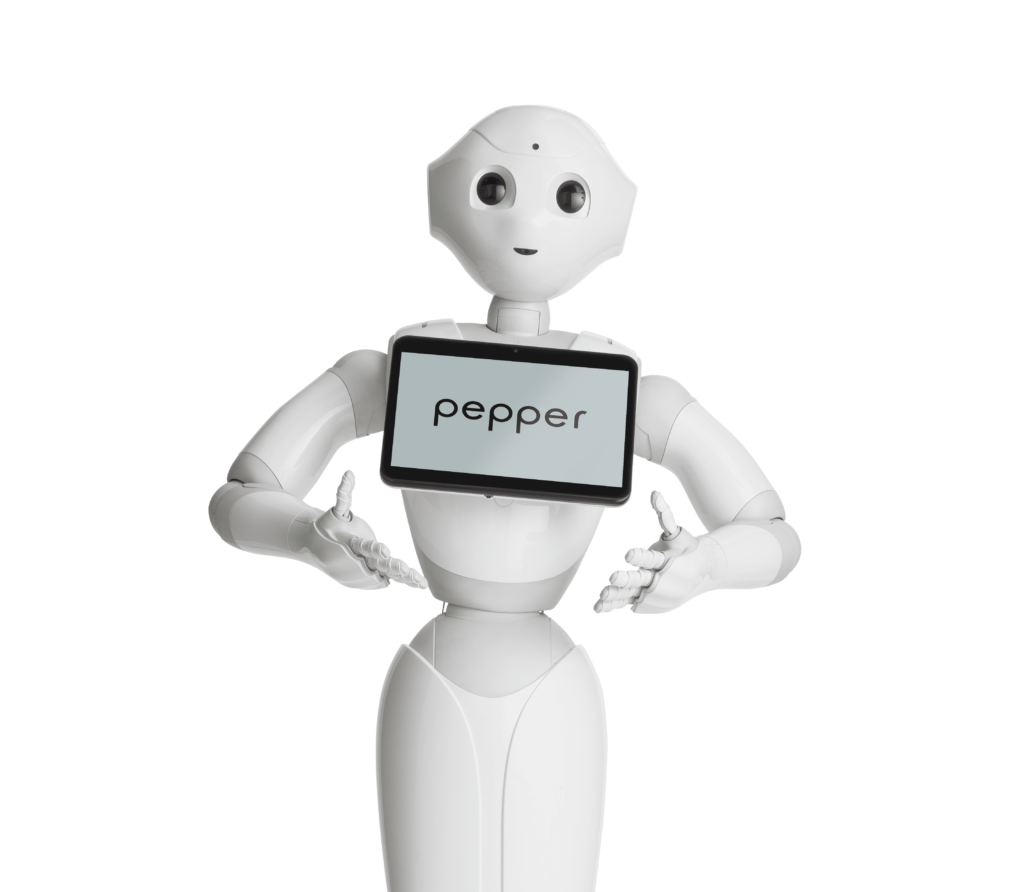
Press the Chest Button once to hear the notification message !
More details here (Notifications section).
2. Daily Use
Turning Pepper On
Before turning Pepper ON, ensure:
- the location is appropriate,
the Stop Button is unlocked, - the Pins are removed and stored in their respective location, behind the neck soft cover,
- the Charging Flap is closed (not mandatory but recommended).
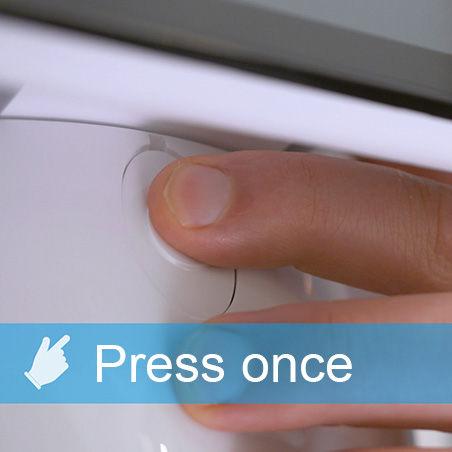
Press the Chest Button once to turn Pepper ON.
Pepper will be ready once he has checked its surroundings and said “Ognak Gnuk”.
If this is the first time you turn Pepper ON, you need to follow the Getting Started Wizard on the tablet.
Once the configuration is done, Pepper is ready to use!
Turning Pepper Off
Normal Turn OFF
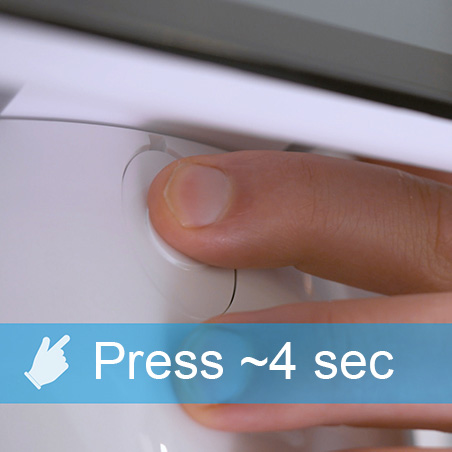
Hold the Chest Button until you hear the sound “Gnuk Gnuk” (~4 seconds).
Pepper says “Gnuk Gnuk”, Shoulder LEDs slowly blink in white, and Ear LEDs fade OFF. Then Pepper goes to Safe Posture.
Forced Switch OFF
Note: Forced switch OFF is not recommended in normal use.
Use this if Pepper does not turn OFF normally.
Make sure there is enough space around Pepper because the motors will switch OFF suddenly and the arms will fall freely.
Press and hold the Chest Button until Pepper turns OFF (~8 seconds).
Rest & Sleep mode
Rest mode (recommended)
In Rest Mode, all activities are stopped, Pepper goes to Safe posture and all motors are turned off: Pepper will not speak or move.
Press the Chest Button twice quickly to enter or exit the Rest Mode.
Sleep mode
In Sleep mode, all activities are stopped, Pepper goes to Safe posture but the motors are not completely turned OFF. Pepper will not speak but it keeps certains reflexes.
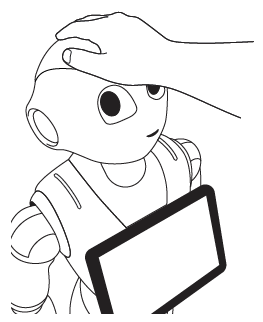
Place your hand on the top camera, fingers on the top Head tactile sensor for 3 seconds to make Pepper go to sleep. Eyes and Shoulders LEDs are purple.
To awake Pepper, just touch the Head tactile sensor.
Charging Pepper
You can charge Pepper using either the Battery Charger or the Charging Station.
A fully charged battery lasts from 7 to 20h depending on what the robot does.
The charging time is about 4h for 80% battery, and about 8h for full charge.
Charging Pepper using the Battery Charger
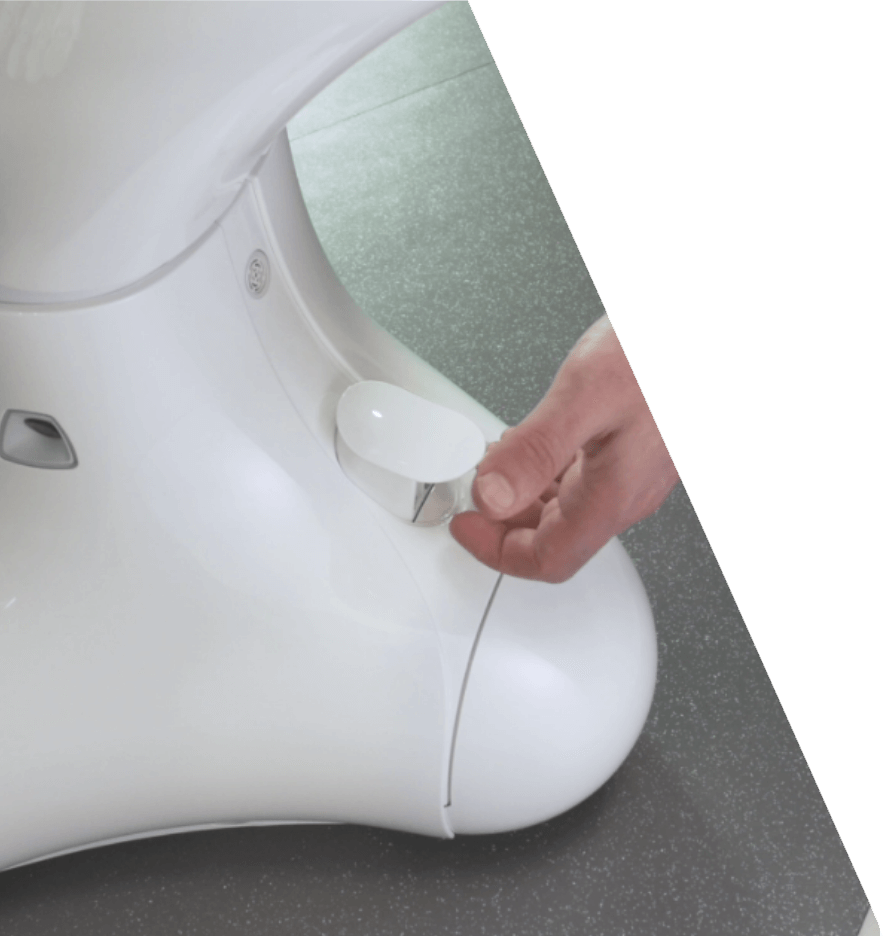
Remove the plastic film from the Battery Charger before using it.
Charging time: ~4h for 80% / ~8h for full charge
Battery life 7~20h, depending on use.
Keep the Battery Charger away from heat sources and liquids
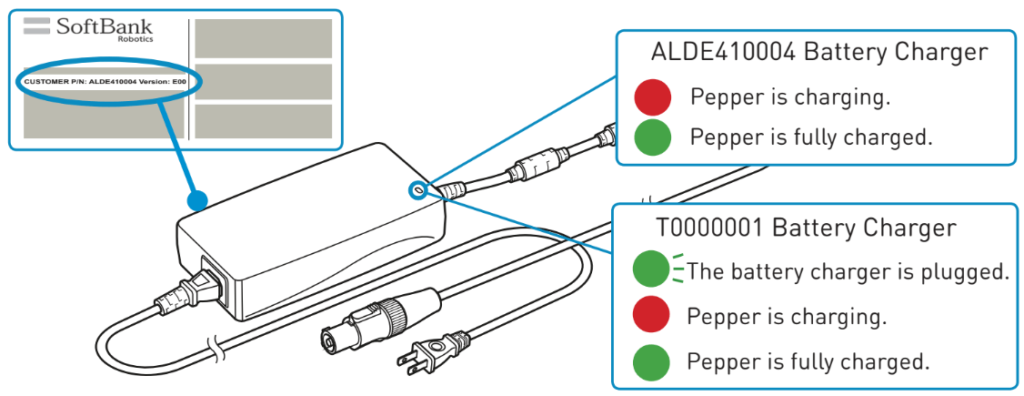
Please note there are two different Battery Chargers.
The LEDs behavior varies with the Battery Charger model (indicated on sticker).
Charging Pepper using the Chargin Station
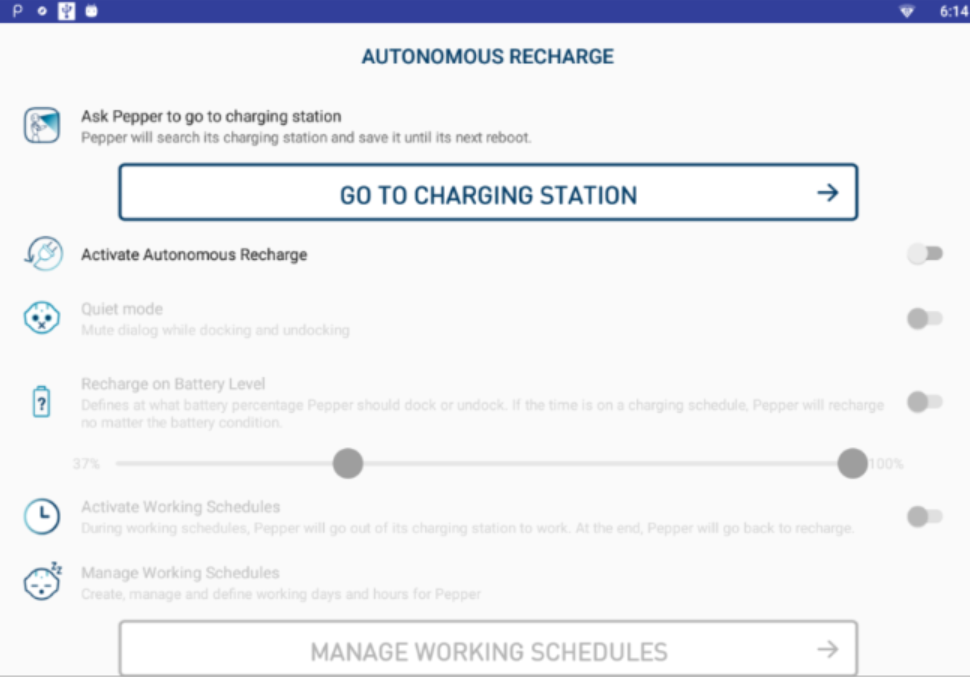
The Charging Station is an extension of the Battery Charger. Instead of manually using the Battery Charger every time you want to charge Pepper, it allows Pepper to take care of its battery on its own.
You need to install and configure the Autonomous Recharge application to use the Charging Station, as described below.
2 App Setup
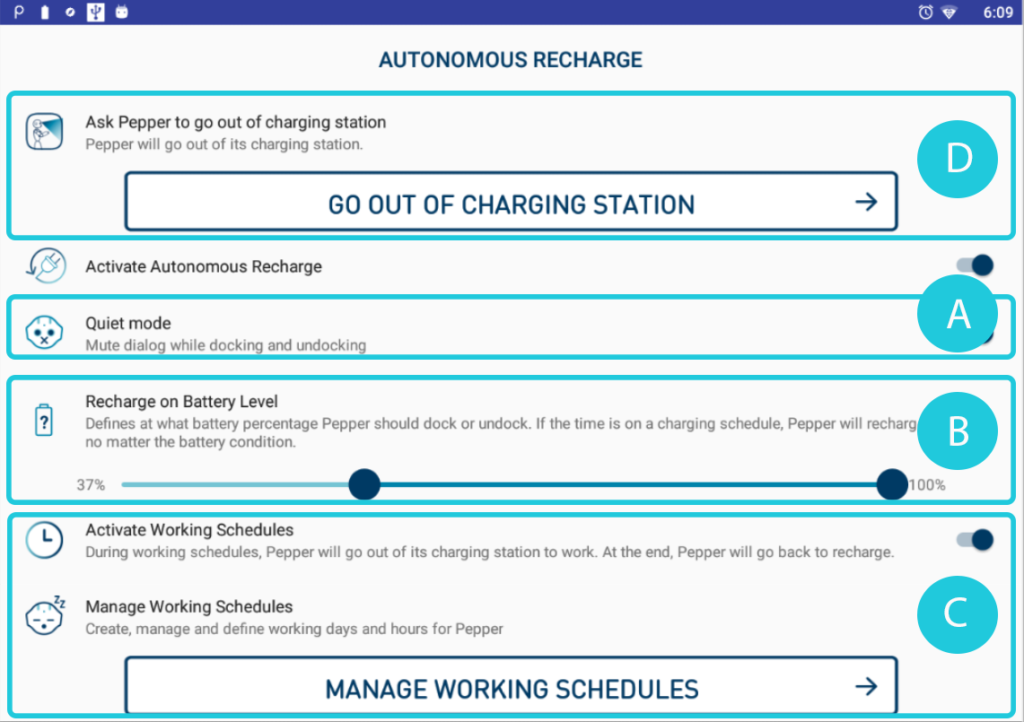
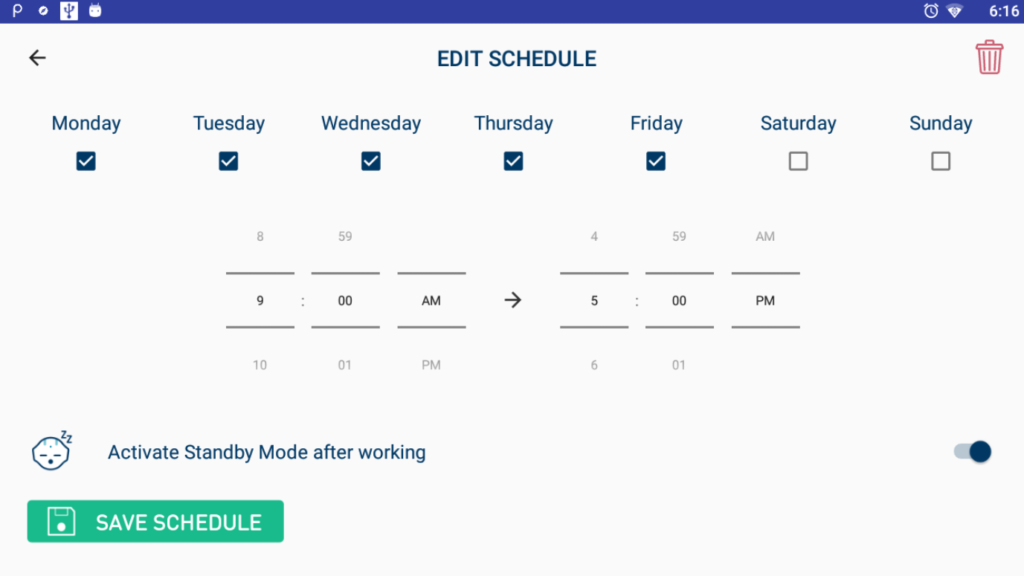
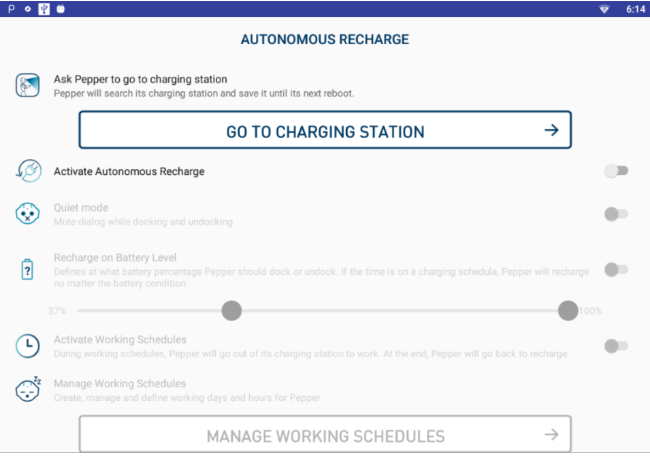
Set Quiet Mode
If activated, no dialog is played when Pepper goes to or leaves the Charging Station, but sounds are still played.
Set Battery Level
Set the battery percentage at which Pepper should go to the Charging Station to recharge itself (lowest) , and should leave the Charging Station (highest).
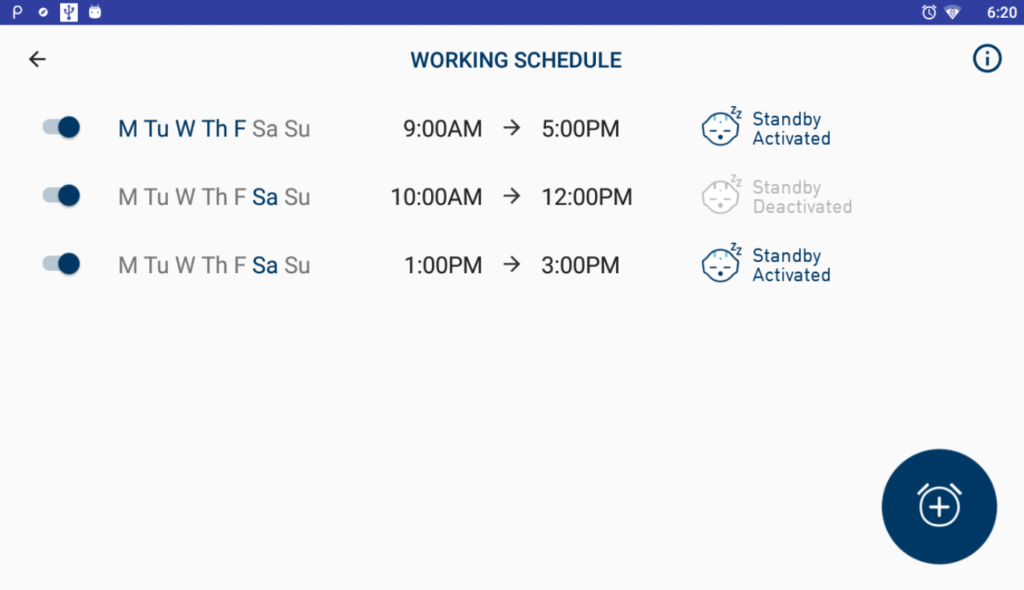
When Battery Level and Working Schedules are both activated at the same time:
- If Pepper is within its working time slot but its battery percentage is under the lowest battery percentage you set, Pepper will go on the Charging Station until it reaches a sufficient battery percentage to work.
- If Pepper is within its charging time slot, it will remain on the Charging Station even if its battery percentage is at the highest battery percentage you set.
Moving Pepper
Ensure the new location complies with Pepper’s use conditions (see “Choosing location” below).
- Make sure Pepper is in Safe Posture.
- Open the Charging Flap to prevent the wheels from locking.
- Place one hand on the shoulder and the other on the hip.
- Carefully roll Pepper to his new location.
Choosing Location
- Ensure Pepper is on a smooth and flat surface (Avoid carpets or rugs).
- Ensure there is at least 90 cm (~35.4 inches) around Pepper.
- Ensure there are no slope or stairs around Pepper.

precautions
- Pepper is designed for indoor use only. Do not use the robot outside.
- Pepper’s operating humidity range must not exceed 80%.
- Keep Pepper away from radiators or other heat sources.
3. Interactions
Talking with Pepper
Pepper is not able to talk unless the appropriate application is installed.
Before talking with Pepper, you must:
- have completed the Getting Started Wizard,
- have installed an application containing dialogs.
Pepper can talk to you in more than 20 languages depending on the applications installed on the Robot.
To be sure Pepper is listening, ensure the shoulder LEDs are blue.
If Pepper is not looking at you, try calling the robot’s name to get attention.
You can apply the following tips to improve your communication:
- Pepper’s hearing area is narrow.
– Keep eye-contact when interacting with Pepper.
– Stay in front of Pepper. - Pepper is listening when:
– Shoulder LEDs are blue,
– Blue line on the tablet. - Speech recommendations:
– Do not speak at the same time,
– Use short sentences,
– Do not speak too fast,
– Do not be shy, speak loud and clear!
Notifications
A Notification combines shoulder LEDs indication and a spoken message.
There is a Notification if the shoulder LEDs blinks, whom importance is defined by the color.
- Green: Information
- Yellow: Warning
- Red: Error
Press the Chest Button once to hear the message.
Make sure Pepper’s volume is high enough.

4. Pepper Configuration
Wifi Configuration
Pepper is running an Operating System (OS) called NAOqi and may run distinct Applications depending on the offering and configuration delivered by your distributor.
To manage the version of your robot’s NAOqi version , and the list of applications installed on your pepper, you will need an access to the management cloud services delivered by Aldebaran or your local distributor.
To get access to the right service for pepper management, please contact your customer support.
Warning
Do not change the Wifi Settings through the “Advanced Settings” menu, or you may face issues like:
- Head/Tablet not a on same network
- Head/Tablet not connected
- Your application might not be fully operational
Procedure
To access the Wifi settings, it is important you go through the Android Settings of the Tablet.
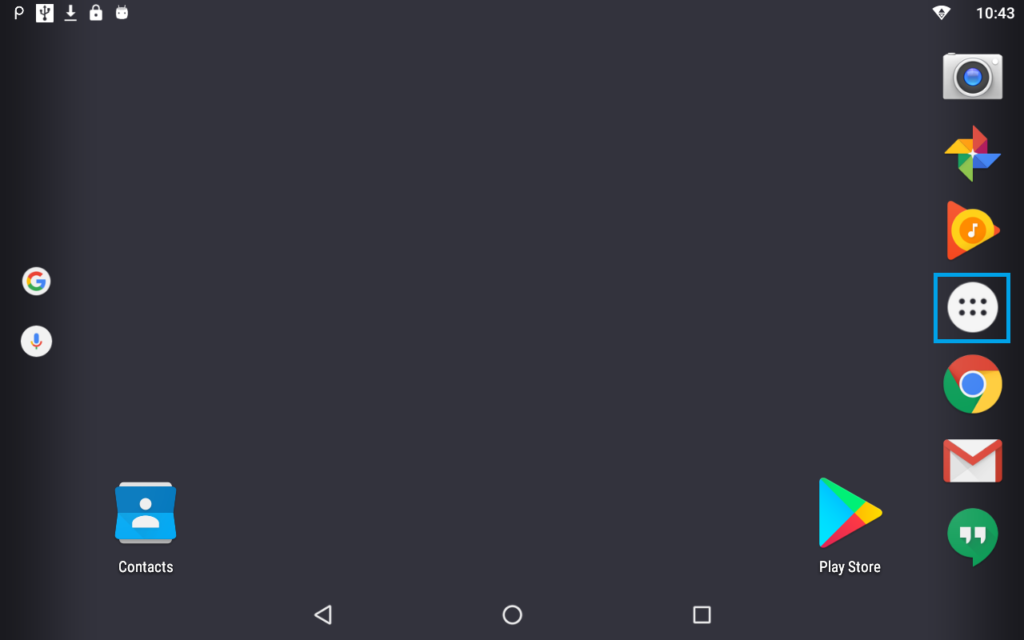
1- On Pepper’s tablet, tap the six dot icon to open the Android menu.
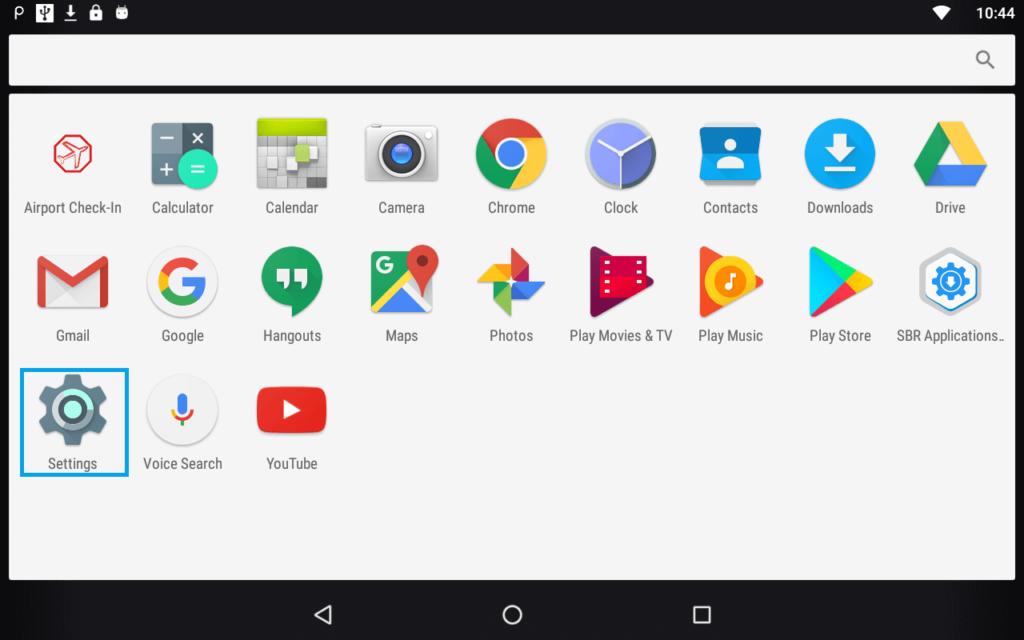
2- Tap the Settings icon to open the Android Settings.
3- Tap the Wifi icon ![]() and set the Wifi from there.
and set the Wifi from there.
Languages
By default, Pepper can speak two languages:
- One of the pre-installed languages that you have chosen during the Getting Started Wizard: English, Japanese or Chinese.
- The second language that you can install afterwards via Cloud management service.
Installing the second language from Command Center
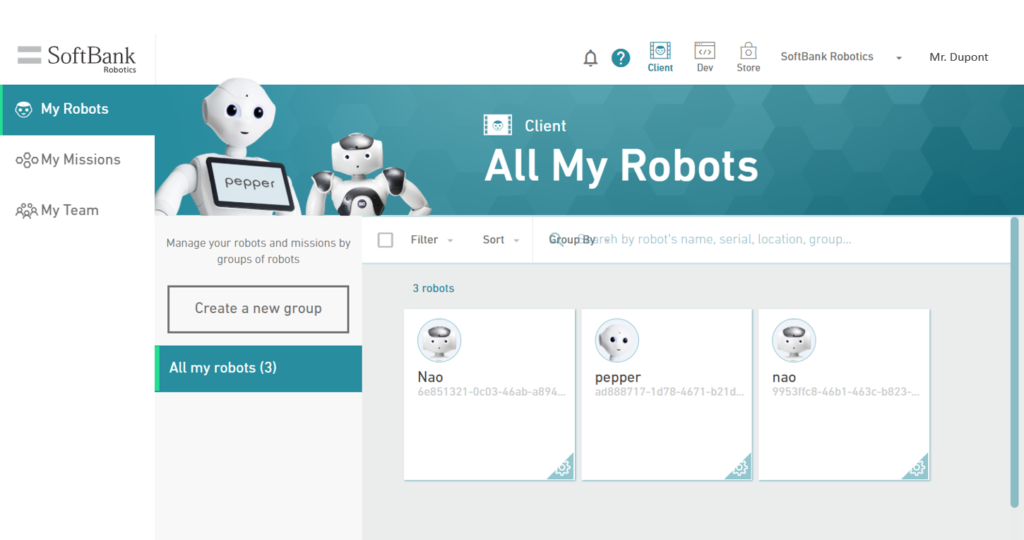
- Sign in Command Center.
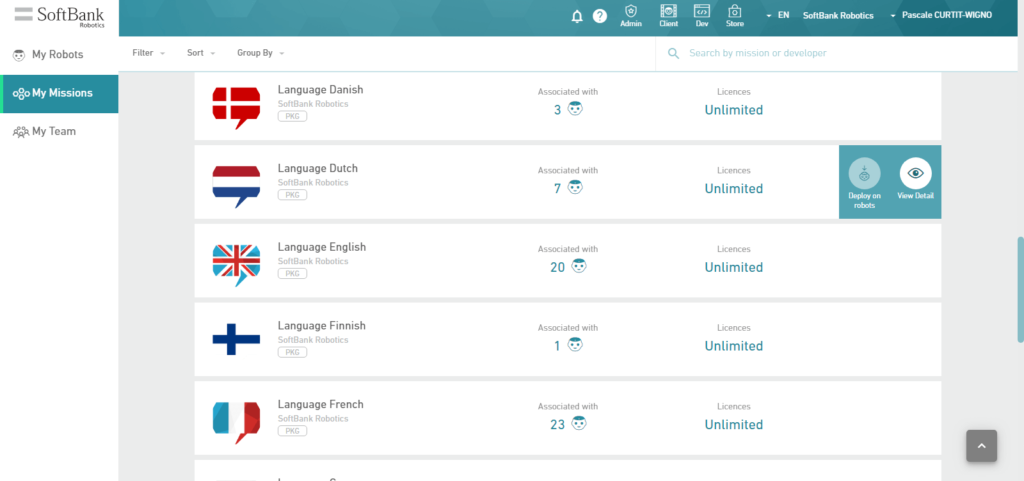
- Click on My Missions.
- Search the language you want in the list of applications.
Tip: Type “language” in the search bar - Hover your mouse over the application line and click on Deploy on robots.
- In the search bar, enter the robot’s nickname, or his Body ID, group or location.
- Select the robot by clicking on it.
- Click on Add selected robots.
The application is now associated to your robot.
Proceed to the next step to finish the installation process
- On the tablet, tap the six dots icon
 .
. - Tap the Settings icon.
- Tab “Update system/robot apps”.
- The Application Store notifies that “There is an application to be updated”.
Tap “Update all robot apps”.
Pepper downloads and installs the language.
![]() To check if the language has been correctly installed, wait for both Shoulders LEDs to blink green and listen to the Robot’s Notification.
To check if the language has been correctly installed, wait for both Shoulders LEDs to blink green and listen to the Robot’s Notification.
Pepper will say: “Hello I’m Pepper. My Internet address is […] I have installed [application name].”
Changing the robot language
- Tap the six dots icon
 .
. - Tap the Settings icon.
- Tap on Language & input.
- Tap on Language.
- Tap the language that you want.
- To check if the language has been correctly changed, listen to the Robot’s notification:
– Press the Chest Button once to hear the notification message.
Installing a third (or more) language
This is possible, but you will need to pay for it.
Only the first two languages are included in our offer.
You must contact your local Sales Representative or the Customer Support.
Updating NAOqi
Whenever there is a new NAOqi version for your robot, you will get a notification on the tablet to inform you that an update is available.
Prerequisites
To perform such NAOqi upgrade, you will need a valid account on the management platform and a Battery Charger.
Procedure
To avoid the process being interrupted, keep the Robot charging while performing the update.
All user data on the robot and on the tablet will be kept after the update.
- Tap the six dots icon
 .
. - Tap the Settings icon.
- Tab Update system/robot apps.
- Tap Update robot system.
 Your robot’s charger must be plugged in or your robot must have more than 80% of battery.
 - Tab DOWNLOAD to update your robot system (NAOqi).
- Tap RESTART & INSTALL.
- When the robot’s tablet displays “Update robot system / Update completed”, tap the screen and wait until the robot wakes up.
- Now both shoulders are blinking green, press once the chest button to get the robot’s notification.
When the update is successful, Pepper will tell you:
“Hello I’m Pepper, my internet address is XX.XX.XX.XX. I successfully updated my system, I’m now in version XX.XX.XX.”
Installing an Application
Applications are installed on robots via the management platform accessible with your account.
Procedure to Install an Application from Command Center
Command Center is the current Aldebaran service to manage the configuration of Pepper running NAOqi 2.9.
The following procedure explains steps to install/upgrade a new application from this service
1. Deploy an application on your robot
- Sign in Command Center.
- Click on My Missions.
- Search the application in the list or enter the application’s name in the search bar.
- Hover your mouse over the application line and click on Deploy on robots.
- In the search bar, enter the robot’s nickname, or his Body ID, group or location.
- Select the robot by clicking on it.
- Click on Add selected robots.
The application is now deployed on your robot.
2. Check the application is correctly deployed on your robot
- Click on My Robots.
- Search the robot in the list or use the search bar: enter the robot’s nickname, or his Body ID, group or location.
- Select the robot by clicking on it.
- In the section Missions, the application now appears.
The application has been correctly deployed on your robot.
3. Installing the application previously deployed (Tablet)
- Tap the six dots icon
 .
. - Tap the SBR Applications Updater icon.
- Tap UPDATE.
Pepper will now install the application.

Are you a developper?
Do you want to learn how to develop cool applications for your robots ?
Contact your Support to discover all the thing you need.
Have fun !
5. Special Operations
UnBoxing
Pepper is heavy! Be careful when holding the robot.
Keep the boxes and protections. You will need them to store Pepper.
- Open the box.
- Fold the top right corner of the box into the dedicated slot as shown in the video.
- Remove the blue cover.
- Pull the ramp out.
- Place your hands under Pepper’s arms, and slowly lift Pepper out.
 Pepper might be unstable and fall if not put in the Safe Posture as shown.
 - Remove the tape and all protections.
- Remove the Pins.
- Open the Soft Cover and store the Pins in their respective slots.
- Unlock the Stop Button then close the Soft Cover.
Reboxing
- Pepper must be switched OFF and the Stop Button pushed.
- Remove the Pins from their storage and insert them in their respective slots.
 Be careful when the Pins are inserted, Pepper’s knee and hip will move freely. Hold the Robot to make sure it does not fall.
 - Bring Pepper in front of the box, and make sure the Charging Flap is closed.
- Lift Pepper to a standing posture while pushing him into the box as shown in the video.
- Carefully bring the box to the floor.
 Be careful, Pepper could be unstable
 - Adjust Pepper in his box
- Close the box with strong tape.
Cleaning


Pepper can be easily cleaned using isopropyl wipes.
Make sure that Pepper is turned OFF, in Safe posture and unplugged, the Charging Flap is closed and the Stop Button is pushed down when cleaning.
you can insert Pins to manually adjust Pepper’s position.
- Clean and disinfect your robot using alcohol (such as Isopropyl) based disinfectant wipes.
- Do not use water.
- Do not use ammonia-based products
Storing
ou must use the orignal boxes and packaging to store Pepper and follow the Reboxing procedure above, as well as the following instructions.
- Turn Pepper OFF.
- Press the Stop Button.
- Fully charge Pepper then close the Charging Flap.
- DO NOT insert the Pins otherwise Pepper might fall (see Pins).
- Ensure the storage location complies with safety recommendations (see Choosing location).
For long storage, charge Pepper at least once every three months otherwise the battery will become unusable.
Special Start-up
When Pepper is off, you can press and hold the chest button until the Shoulder LEDs are blue (around 4 seconds) to perform a special start-up.
This process takes long (15 minutes), and you should not need to do this on a regular basis.
This will update all the robot firmwares. You can use this to try solve some errors.
The process is over when Pepper says “Ognak Gnuk”.
Factory Reset
What is it?
A Factory Reset operation resets the Robot to its factory settings:
- It removes the User data and the system partition that are on the Robot.
- It reinstalls a NAOqi on the Robot.
- It erases the User data on the Tablet and reinstalls Android OS on the Tablet.
To avoid the Factory Reset process being interrupted, keep the Robot charging while performing the Factory Reset.
Procedure (Via Tablet Settings)
A Factory Reset will erase all the user data that is on a Robot.
You must be owner or admin of the Robot to perform a Factory Reset.
- Turn the Robot ON
- Plug in the Battery Charger.
- On Android home screen, click the circle (with 6 dots) in the center right border.
- Tap Settings to launch the settings menu.
- Scroll down. Tap Backup & Reset.
- Tap Factory Data Reset.
- Tap Reset.
- Tap ERASE EVERYTHING.
- Enter your SoftBank Robotics account and password linked to the robot.
- Tap OK.
You must be owner or admin of the Robot to perform a Factory Reset. If not, when you enter your user info, the Tablet displays a message error: “Unknown error occured”.
NAOqi System Image download starts. This step may take a while, depending on the download speed.
When the Factory Reset is completed, the Robot stands up and the Shoulder LEDs blink green.
You will need to follow the Getting Started Wizard again.
To check that the Factory Reset has been properly done, press the Chest Button once to hear Pepper’s notification.
Pepper says: “I have successfully updated my system, I am now running version XXXX. I have successfully completed my factory reset, all my data and settings have been reset .”
Emergency Stop
When Pepper is ON, pushing the Stop button will immediately stop the robot and data will not be saved.
the Stop Button is located under the Soft Cover.
Use this in case of emergency, such Liquid spill, Pepper has fallen, Unexpected physical behaviour….
When Pepper is OFF, you can leave the Stop button pushed for security. especially when Pepper is in the box and/or stored, cleaning Pepper…
Unlocking the Stop Button
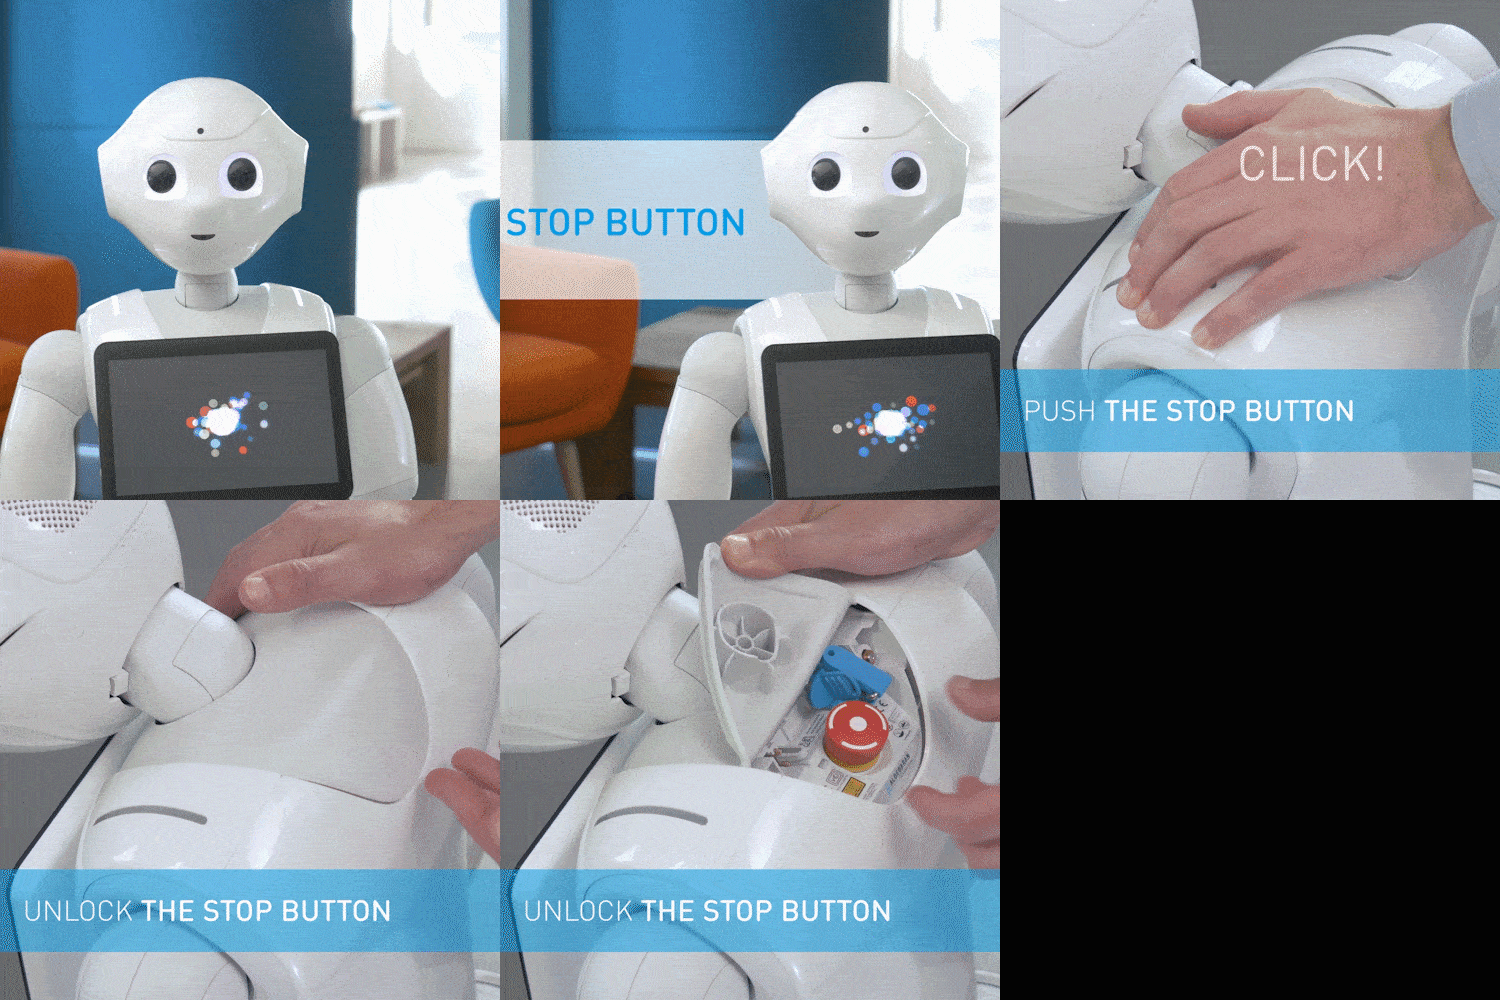
If the Stop Button is pushed down, unlock it as shown in the video before turning Pepper ON.
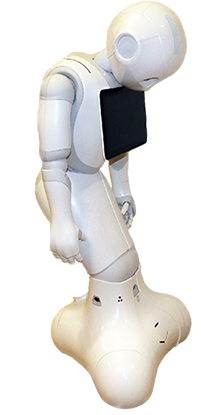
Put Pepper in Safe Posture
In this posture, Pepper is stable, its motors and joints are safe.
Pepper will go in this posture when:
- Turned OFF,
- In Rest mode.
You should always have Pepper in Safe posture when:
- You want to move Pepper,
- You want to clean Pepper,
- You don’t use Pepper.
Pepper has fallen ?
What should you do if Pepper falls?
- Push the Stop Button
- Insert the Pins to unlock the joints.
- Lift Pepper and put it in the Safe Posture.
- Do a visual check to see if something is broken.
- If nothing looks broken, remove and store the Pins, unlock the Stop Button and try to turn it on.
- If it does not work, or if you see it is broken, contact support.
NEVER try to repair Pepper by yourself, you could do more damage and void your warranty.
